Python on the Chumby Hacker Board
I picked up a couple of Chumby Hacker Board beta units from Adafruit for a project I'm working on, and of course I'm looking to use Python to write my app for the project. Turns out it's not all that tough.
I'll skip over the basics of getting your CHB talking to your PC over a serial connection- Adafruit covers that on their wiki page. I will, however, add a note to their method to say that, unless you're planning on doing a vast amount of Chumby hacking, you might be better served making an adapter to connect your FTDI cable to the CHB rather than rejiggering the connector. It's pretty easy- if the CHB header had two pins between RX and GND instead of one, you'd be able to plug it in directly, as the FTDI cable has the pins in the proper order.
By the way, I find putty a more palatable terminal program than HyperTerminal for this process, but that's just me.
Also, it may be a good idea to install the gcc environment on your board before installing Python. I'll not cover that, as Adafruit have a walkthrough of that as well.
I'm going to assume a level of novice Linux usage here- I'll try to put things in bold if I feel they warrant attention even from the more experienced Linux user.
Now that you're all set up and talking to the CHB, the first thing you need to do is acquire the Python package. There are directions for doing this on the Chumby wiki, but here it is in a nutshell:
1. Visit the above link and download the "python2.6-chumby.tgz" file at the bottom. If you are an over-achiever they have directions for building it from source, so you can use the latest and greatest version of Python, but 2.6 is probably just fine for most purposes.
2. Throw that file onto a USB flash drive. Plug that drive into your CHB.
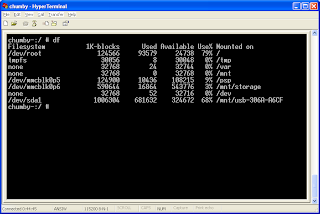 3. Locate the mount point of your drive by typing "df" at the # prompt. As you can see above, this returns a list of the available filesystems. My drive is mounted at "/mnt/usb-306A-A6CF".
4. Copy the file from your flash drive to the local storage. The command for this is "cp/ /mnt/storage/", where and are replaced by your particular drive ID and filename. In my case, I left the filename as standard, so I type "cp /mnt/usb-306A-A6CF/python2.6-chumby.tgz /mnt/storage/". Typing "ls /mnt/storage" will pull up the local storage directory contents. Note that the root filesystem is by default read-only, so you must copy it to /mnt/storage. That's what /mnt/storage is there for.
5. Change the working director to /mnt/storage- "cd /mnt/storage" does this. The rest of this tutorial assumes that your working directory is /mnt/storage.
5. Unzip the tgz. The command for this is "gzip -d python2.6-chumby.tgz". This will unpack the .tgz into a .tar archive.
6. Extract the tar file. It's a good idea to make a new directory to extract the contents into first- "mkdir python" will create a new directory called "python" in /mnt/storage. The command to extract the files is "tar -x -f python2.6-chumby.tar -C python"; this will create two subdirectories in the python directory, "bin" and "lib".
7. Add the /mnt/storage/python/bin directory to your path. This way, simply typing "python" at the # prompt will execute the Python interpreter, and your Python scripts can be executed as shell scripts.
7a. As mentioned above, the root filesystem is read-only. To make it writable, the command is "mount -o remount,rw /". The filesystem will be restored to read-only upon reboot.
7b. Back up the file /etc/profile. "cp /etc/profile /etc/old_profile".
7c. Edit /etc/profile. The savvy and swanky will do this using VI on the device itself; you're probably better off just pulling it off onto a flash drive, editing it on a more forgiving system, and copying it back. To do this, use the "cp" command to copy it to your flash drive ("cp /etc/profile /mnt/ usb-306A-A6CF" for my flash drive path), edit it on your main PC in your text editor of choice, then reverse the process ("cp -f /mnt/usb-306A-A6CF/profile /etc/"; the -f switch forces the overwrite, and the trailing slash on "/etc/" indicates that you want to create the file in the directory without a name change).
8. Restart the CHB. Type "python" at the # prompt and you should see the Python shell start.
And that, as they say, is that.
One more note: If you want to make a script directly executable rather than running it as a parameter to python, add the line "#! /usr/bin/env python" to the top of the file. Use "chmod +x myscript.py" to add executable mode to the file's properties. The resulting file can be executed like any other shell script (by typing, for example, "./myscript.py").
Next up, I'll prepare a walkthrough of adapting "regutil" to a .dll, so you can modify the registers and access I/O from within your Python scripts.
I'll skip over the basics of getting your CHB talking to your PC over a serial connection- Adafruit covers that on their wiki page. I will, however, add a note to their method to say that, unless you're planning on doing a vast amount of Chumby hacking, you might be better served making an adapter to connect your FTDI cable to the CHB rather than rejiggering the connector. It's pretty easy- if the CHB header had two pins between RX and GND instead of one, you'd be able to plug it in directly, as the FTDI cable has the pins in the proper order.
By the way, I find putty a more palatable terminal program than HyperTerminal for this process, but that's just me.
Also, it may be a good idea to install the gcc environment on your board before installing Python. I'll not cover that, as Adafruit have a walkthrough of that as well.
I'm going to assume a level of novice Linux usage here- I'll try to put things in bold if I feel they warrant attention even from the more experienced Linux user.
Now that you're all set up and talking to the CHB, the first thing you need to do is acquire the Python package. There are directions for doing this on the Chumby wiki, but here it is in a nutshell:
1. Visit the above link and download the "python2.6-chumby.tgz" file at the bottom. If you are an over-achiever they have directions for building it from source, so you can use the latest and greatest version of Python, but 2.6 is probably just fine for most purposes.
2. Throw that file onto a USB flash drive. Plug that drive into your CHB.
 3. Locate the mount point of your drive by typing "df" at the # prompt. As you can see above, this returns a list of the available filesystems. My drive is mounted at "/mnt/usb-306A-A6CF".
4. Copy the file from your flash drive to the local storage. The command for this is "cp
5. Change the working director to /mnt/storage- "cd /mnt/storage" does this. The rest of this tutorial assumes that your working directory is /mnt/storage.
5. Unzip the tgz. The command for this is "gzip -d python2.6-chumby.tgz". This will unpack the .tgz into a .tar archive.
6. Extract the tar file. It's a good idea to make a new directory to extract the contents into first- "mkdir python" will create a new directory called "python" in /mnt/storage. The command to extract the files is "tar -x -f python2.6-chumby.tar -C python"; this will create two subdirectories in the python directory, "bin" and "lib".
7. Add the /mnt/storage/python/bin directory to your path. This way, simply typing "python" at the # prompt will execute the Python interpreter, and your Python scripts can be executed as shell scripts.
7a. As mentioned above, the root filesystem is read-only. To make it writable, the command is "mount -o remount,rw /". The filesystem will be restored to read-only upon reboot.
7b. Back up the file /etc/profile. "cp /etc/profile /etc/old_profile".
7c. Edit /etc/profile. The savvy and swanky will do this using VI on the device itself; you're probably better off just pulling it off onto a flash drive, editing it on a more forgiving system, and copying it back. To do this, use the "cp" command to copy it to your flash drive ("cp /etc/profile /mnt/
8. Restart the CHB. Type "python" at the # prompt and you should see the Python shell start.
And that, as they say, is that.
One more note: If you want to make a script directly executable rather than running it as a parameter to python, add the line "#! /usr/bin/env python" to the top of the file. Use "chmod +x myscript.py" to add executable mode to the file's properties. The resulting file can be executed like any other shell script (by typing, for example, "./myscript.py").
Next up, I'll prepare a walkthrough of adapting "regutil" to a .dll, so you can modify the registers and access I/O from within your Python scripts.


Hi!
ReplyDeleteI've been following all your instructions and finally I'm able to run the python shell directly in my CHB :D However, when I press the backspace key, or the 'arrow' keys, the symbol "^-H" and something similar to "^]]D" appears... It's quite strange, 'cause the linux shell itself is working fine, and all the keys behave as the 'usual' way...
Do you have any clue on this?
Thanks in advance!
And great post, by the way! :D